Installing baseboards is a great way to enhance your home appeal. Whether it’s carpeted or hardwood floors, it can give a clean and stylish look to any room.
You can DIY the project or hire a professional to install it for you. A pro installer may have a choice about laying the rug first or laying the baseboard first.
To DIY your project, you want to follow the tips below:
What Type of Wood is Used for Baseboards?
According to Grill (2019), you can use either hardwood or softwood for baseboards.
A few popular hardwoods for baseboards include poplar, cherry, oak, maple, and walnut, whereas the softwood you can use for baseboard is pine.
Other non-popular types of wood occasionally used for baseboards are mahogany, Hemlock, Basswood, and Cedar.
Poplar: A cheaper alternative is known for being easy to work with due to its lack of density. It’s is often painted instead of stained.
Cherry: This is expensive wood, but known for its rich color and ease of work.
Oak: Many types of oak can help with stain removal. It is durable and can withstand internal movements well.
Maple: Very thick wood that resists internal movement well. Of course, the colors are brighter and offer a variety of stylish color options.
Walnut: Expensive wood and durable. It comes in natural dark colors that limit your coloring possibilities.
Pine: cheaper and easier to work with. Brighter options give you more color options. Many types of pine are “joined” when small planks are joined into long pieces. Some homeowners don’t like this look.
Softwoods: These may be great alternatives for dealing with stains, but they’re less tolerant than the common hardwood options according to Grill (2019).
You can use the following factors to determine which wood type to choose for your baseboard installation:
• No need for expensive wood if you want to
• If you want stained baseboards, go for different stains, clear coats, or varnishes on different types of wood to get your preferred look.
• Hardwoods are more resistant to denting and scratching
• Painted wood is usually easier to repair (eg filling and repainting the dents).
• Your local home center will likely have the best suitable baseboard word for your locality (Grill, 2019).
What Kind of Paint Do You Use on Baseboards?
Baseboard painting is one of the best ways to enhance the curb appeal of your rooms and it only takes a day or two.
Painted baseboards help your space shine like no other. When painting baseboards, there are three common types of paints according to Grill (2019):
Oil paints
Oil paints are traditional paints for professionals. Due to its greasy nature, it dries gently and leaves a beautiful, professional look.
However, oil paints commonly contain VOCs which are harmful chemicals. They’re equally difficult to remove.
The estimated drying time for oil paints is 10 to 18 hours. This makes it tasking to finish your painting over the weekend. Nonetheless, in many instances, you can apply just one
Water-based paints
Water paints are not as durable as oil paints. Baseboards with a short-term life span mean it’s not scratch-resistant and requires cleaning, it may not be the best choice for water paints (acrylic paints) that require cleaning.
But people always use them. Water paints dry quickly, are easy to clean, and are considered environmentally friendly.
Alkyd Acrylic Hybrid
Because of the legal requirements and environmental considerations of oil-based paints,
Referred to as an acrylic-alkyd hybrid, this new type of
However, not all manufacturers produce acrylic alkyd coatings, and if so, not all types of shiny materials.
In most cases, the best base
For latex or oil paints, you can choose from several levels of sheen, but a slightly glossy surface is usually recommended for baseboards.
Because it is scratch-resistant and easier to clean, Semi-matte or glossy
What is a Bullnose Corner?
Bullnose corners are principally curvy edges on the corners of walls and other surfaces during construction.
They are often found in adobe buildings but have gone into the modern design as part of a new home. They make it look finished and are easy for any DIYer.
Use a round corner roller and apply it similar to drywall tape to avoid overlapping the edges of the drywall board.
How to Cut Baseboard Around Bullnose Corners?
Baseboard cut around the bullnose corners includes additional cuts at different angles and an additional central part that wraps around the corner connecting the two parts.
The result is 3 parts with 4 cuts at 22.5 degrees and a total of 90 degrees.
Below is how you can set it up:
- To begin, align and mark the exterior boards on the wall.
- Middle piece: Cut the center with a miter saw (5/8 to 3/4 inches inside for a 90-degree angle). With the marks evident, the two outer cuts are at a 22.5-degree angle.
- Sidepiece: Using your board creates a 22.5-degree internal cut on each board’s board and mark it on the top view.
Follow these tips:
Cut the center of the bullnose corner
Be patient and try to get an accurate cut. Make a nice middle piece and use it as a marker for future details.
Bullnose corner – Centerpiece
The middle part is small and averages 22.5 degrees.
Make marks on the baseboard cuts you’ve got
Choose a preferred method and make a marking on your side piece to make it for you to cut.
Set the saw to 22.5 degrees
For convex head corners, all cuts (except board size) are at a 22.5-degree angle. Most planetary saws can be tilted or twisted to adjust this angle.
Important Tip: Not all walls are the same. Some corners are 91 degrees or 89 degrees, which affects the look and feel of the cut. It is recommended to use an online finder to estimate the angle and add the angle as you cut to include more than 91 degrees (Grill, 2019).
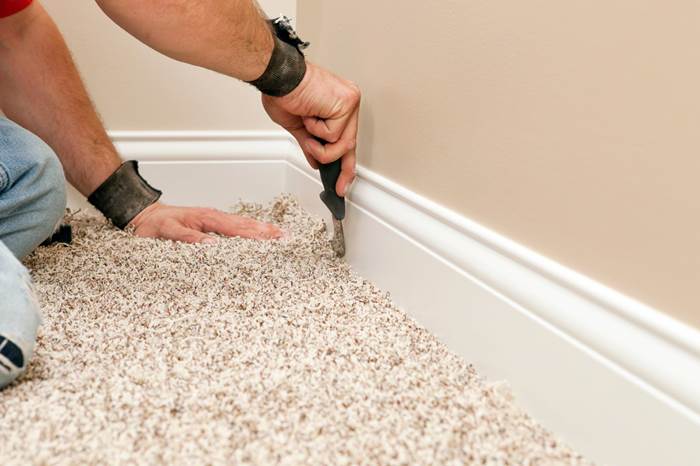
Do Baseboards Need to Be Installed Before Carpet?
If you are remodeling a room, you may have wondered if you should do the baseboard or carpet first. The routines you set up can affect the efficiency of the process and reduce headaches in the process. So, what do you need to install first: a baseboard or rugs.
Does the baseboard go in front or behind the carpet? Whether to set up the baseboard in front or behind the carpet is commonly depends on your preference.
If you want to set up your baseboard before the carpet, leave space between the floor and the baseboard. This can make carpeting a bit difficult, and you need to be careful not to damage the baseboard when installing the hinges.
Place it behind a carpet for easy fixing to the wall. However, if you need to
Baseboards are often placed before the floor because they need to be stained or painted, and it’s much easier not to worry about staining wood, tiles, or carpets.
Cut the baseboard to the desired length with a hand-cutting tool (Morris, 2018).
How to Paint Baseboards With Carpet?
The best way to go about this is what was installed first – baseboard or carpet? When you have this figured out, then also check the tips below to
- Was the carpet installed close to the wall, or behind the baseboards?
- Did the carpet end before the baseboards with working space at the edge of the carpet?
- Did the baseboards straight above the floor with no space in between or does it have space?
Considering these factors first will help you in the process of painting your baseboards and making the right decisions.
3 different ways to
1. Remove, Repaint and Replace
Carpets are lots of hassles when painting. They can easily block your way. When painting baseboards, most craftsmen consider removing them, painting and replacing the boards.
Be aware though, that removing the baseboard can involve lots of tasks and will require patient and time to preserve the boards without damaging them. Painting baseboards require more attention to detail.
If the baseboard touches the floor with no gaps, removal, and replacement may be your best solution.
2. Rollback the carpet
The carpet is attached to a wall or baseboard with fastening strips. These strips are connected to the carpet floor with the use of small nails. Repainting the carpet by rolling back this way is best suited for experienced professionals.
It works well when the carpet is only a small part of the house or when the job is done by an experienced professional.
3.
Most people working Do-it-yourself homeowners can update the color of their baseboards with a little preparation. Laying the baseboard immediately on top of the carpet without space in between the floor makes painting in the field difficult.
The baseboard needs to have a gap to be painted. Space gives the painter full access to the baseboard for covering and fixing the carpet and for painting. Experts have found several ways to do this through the use of:
- Painting application Guide,
Paint Protection, Carpet cover - Painters or Masking Tape
- Cereal box
Best Tools to Paint Baseboards Like a Pro
All baseboard painting projects need
Preparatory tools
- Painters Tape or Masking Tape for protecting spaces around the baseboard and guide your painting.
- Drop Cloth
- Dropcloth takes care of accidental spillage on the floor.
- Rosin Paper spread on the floor before painting
- Sanding Pad for easy sanding of your baseboards.
- Fill Stick or putty for concealing dents
Painting tools
- Angled Brush
- Paint Guide
- Knee Pads
- 5 in 1 Tool
- Functional Light
- Edging Pad
- Tape and Paper Dispenser
